Getting verified on Instagram is a big deal for many users. It shows you’re credible and authentic. But, it’s not easy. You need to focus on creating great content, engaging actively, and meeting Instagram’s tough rules. This guide will explain the steps clearly, look at old and new ways to get verified, including the Meta Verified service, and talk about why being verified is more than just getting a blue checkmark. What’s not so clear is how all these factors play into Instagram’s decision to verify you or not.
You can get a Verified Badge on Instagram in two ways. The first is by applying for account verification, which is free, and the second is by getting Meta Verified, which is paid.
Getting an Instagram Verified Account (Free)
An Instagram-verified account signifies that the account has been authenticated based on the user’s activity across Instagram and related platforms, as well as the documentation or information they have provided. This verification confirms the authenticity of the account, ensuring it belongs to the real person, business, or entity it represents.
You can get the Instagram verification badge for free by applying for Account verification. All you need to meet the eligibility criteria to get verified on Instagram.
Eligibility for Instagram Verified Account
To get your account verified, here’s what you need to keep in mind:
- Be Real: Your account should represent a real person, business, or entity. No fakes allowed!
- Stand Out: You need to have a unique presence. That means only one account per person or business can be verified, except for language-specific ones. Sorry, general interest accounts like @puppymemes don’t make the cut.
- All Set Up: Make sure your account is public, has a bio, and profile picture, and is active. These are must-haves when you apply.
- Get Noticed: Your account should represent someone or something well-known and frequently searched for. We’ll check if you’ve been featured in several news sources (but not paid or sponsored content).
Quick Tip: Double-check your username before you apply. Once you’re verified, you can’t change it.
Heads Up: If you get the badge using false info, we’ll remove it and might even disable your account. So, play it straight!
Applying for Instagram Verification
Here’s how to request a verified badge for your account:
1. Log in to the account you want verified.
2. Go to your profile by tapping your profile picture in the bottom right.
3. Tap the options menu in the top right corner.
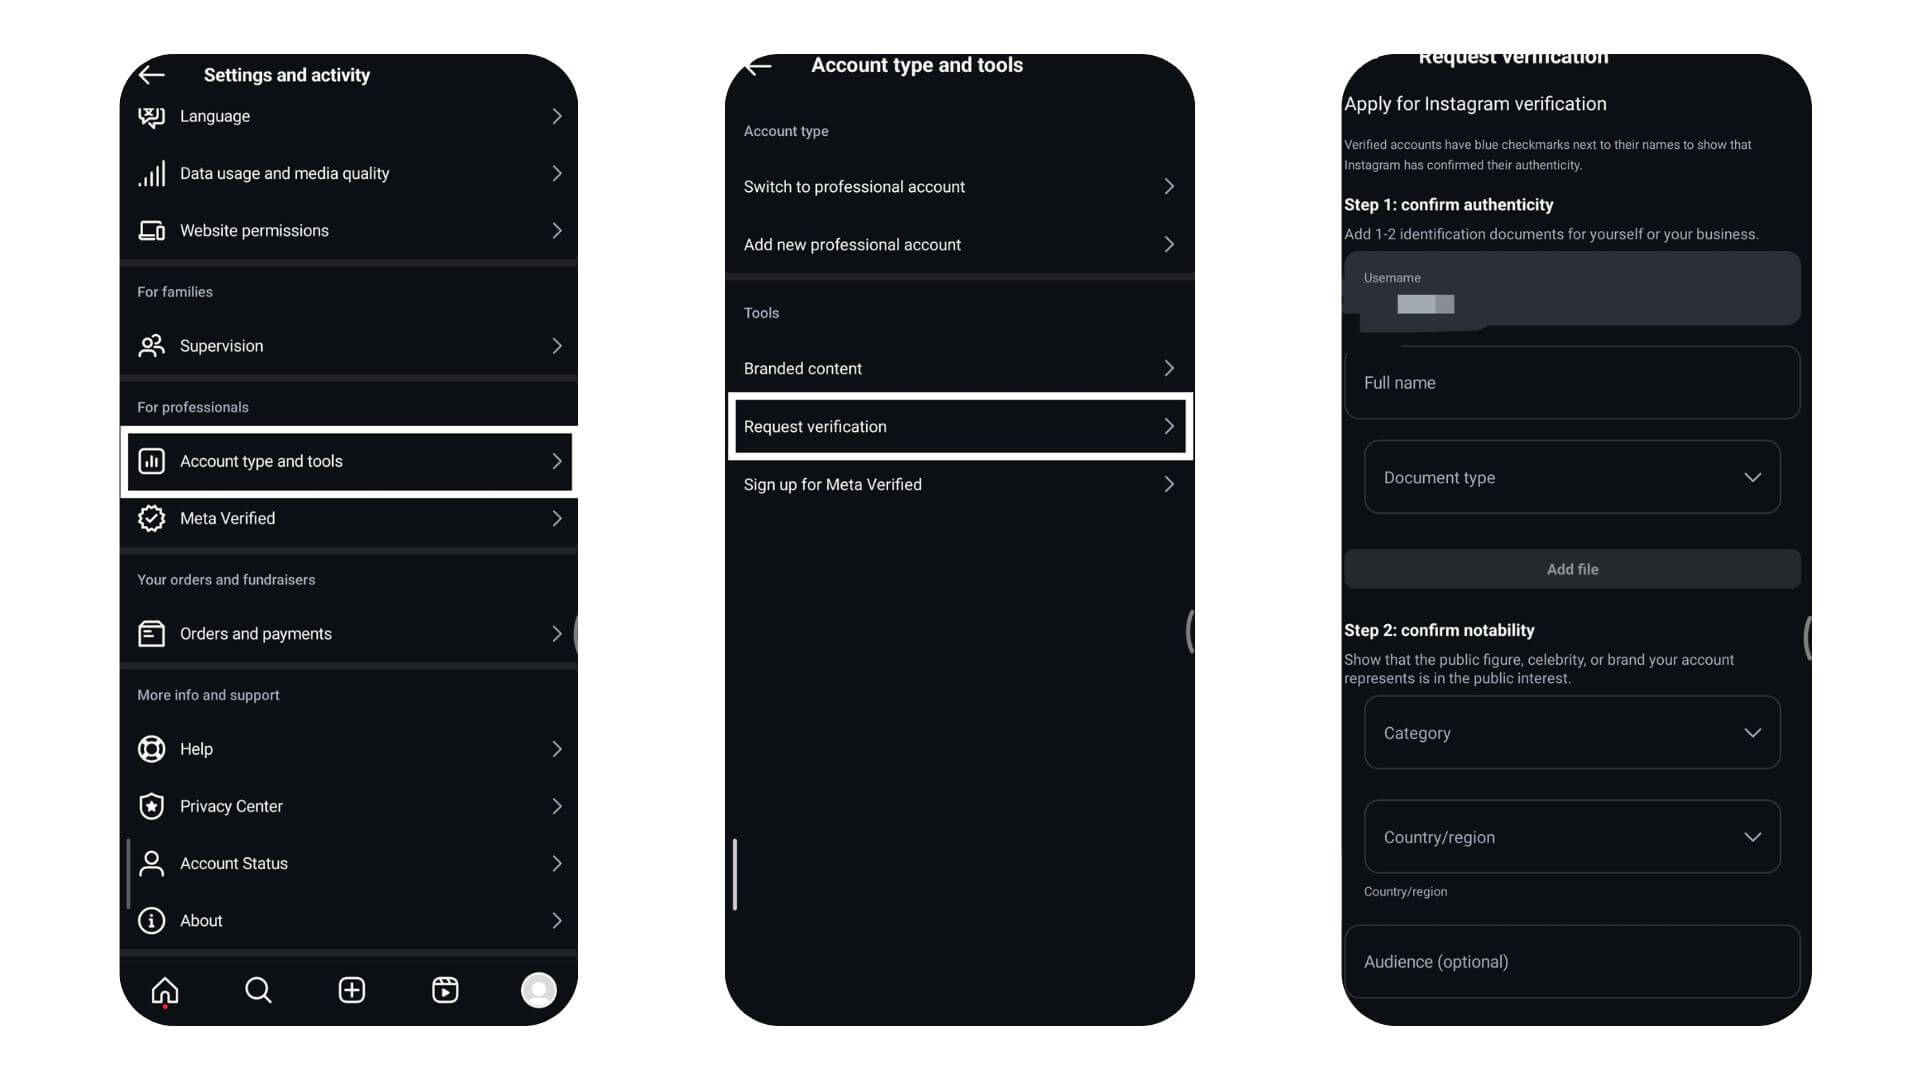
4. Under “For professionals,” select “Account type and tools.”
5. Tap “Request verification.”
6. Fill in your full name and upload a form of ID (like a government-issued photo ID or official business documents).
7. Follow the instructions on the screen, then tap “Submit.”
IMPORTANT NOTE:
- No Guarantee: Being eligible doesn’t mean you’ll definitely get verified.
- Single Request: Submitting multiple requests won’t help and applying again before getting a decision will cancel your current application.
- Username Stays: After verification, you can’t change your username or transfer the verification to another account.
- Platform-Specific: Verification on Instagram doesn’t apply to Facebook. Check the Facebook Help Center for their verification process.
- Be Honest: Using false info to get verified will result in losing your badge and possibly having your account disabled.
Meta Verified: The Paid Verification Path (Paid)
If you are ready to pay a subscription fee to get the Instagram-verified badge, you can opt for the Meta Verified badge. This way you can get the Verified Badge along with some extra advantages. This service includes:
- Verified Badge: A blue checkmark that indicates your account has been verified for authenticity.
- Dedicated Account Support: Access to customer support for issues related to your account.
- Impersonation Protection: Enhanced security features to protect your account from being impersonated by others.
- Additional Features: Other exclusive tools and features to enhance your Instagram experience.
If you already have a verified badge, you can still subscribe to Meta Verified. Doing so will allow you to enjoy the new benefits and features provided by the Meta Verified subscription, on top of the existing verification status.
Eligibility to get Meta Verified
User’s Eligibility:
To sign up for Meta Verified as a creator, make sure that:
- You are at least 18 years old or the legal adult age in your country.
- The residency should be in a country where Meta Verified is offered.
- You have an eligible Instagram or Facebook account.
- You possess a valid government-issued photo ID.
Account Eligibility
To qualify for Meta Verified on Instagram, make sure you:
- Have a personal or professional creator account (in supported countries) with a profile picture and name that follow Meta Verified naming guidelines.
- Stay within the allowed limits for account changes (like account type) within a set time frame, applicable in select countries.
- Enable two-factor authentication on your profile.
- Meet minimum activity standards, including a history of prior posts.
Also Read: Instagram Moon Meaning: What Is Quiet Mode And How To Turn It On?
Steps to Get Meta Verified on Instagram
Here’s how to get verified on Instagram with Meta Verified:
Step1: Subscription
- Log In: Open the Instagram app and log into your account.
- Go to Profile: Tap your profile picture in the bottom right to access your profile.
- Access Meta Verified: Tap the menu in the top right, then select Meta Verified.
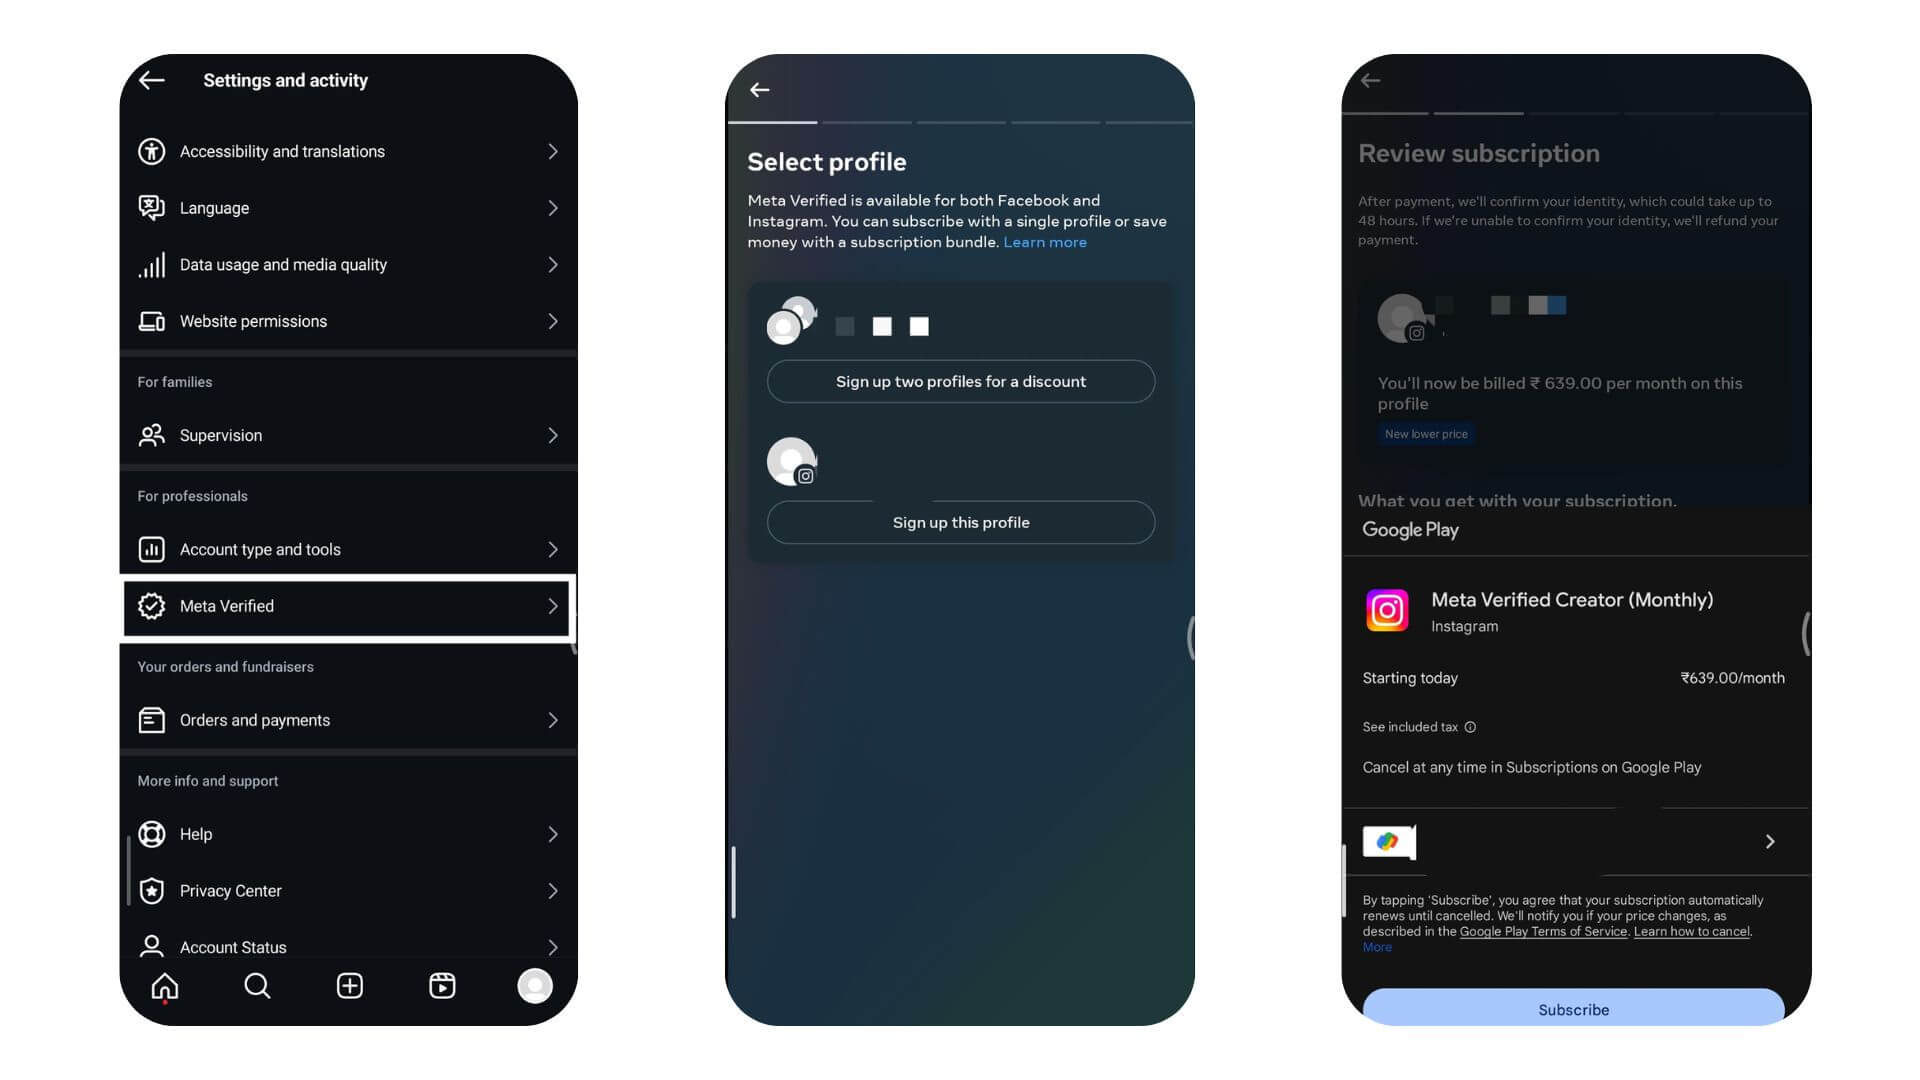
- Choose Profile: Select the profile you want to verify and tap “Single profile subscription.”
- Payment: Tap “Pay now” and confirm your payment through the Google Play Store.
Step2: Enable Two-Factor Authentication
- Security Setup: Turn on two-factor authentication to enhance your account security.
- Select Method: Choose a security method from the options and tap “Next.”
- Follow Prompts: Follow the on-screen instructions to complete the setup.
Step3: Profile Information
- Review Profile: Confirm or edit your profile name and picture.Note: Updating your profile name or picture after verification might require re-verification.
Step4: Identity Confirmation
- Upload ID: Upload photos of your government-issued photo ID (front and back) to confirm your identity.Note: If you encounter issues uploading your ID, try some troubleshooting tips.
- Select ID Type: Choose the type of ID you will upload and tap “Next.”
- Take Photos: Tap “Take a photo” to capture the front of your ID, ensuring the information is readable, then tap “Next.” Repeat for the back of your ID and tap “Submit.”
- Complete Process: Tap “Finish” to complete the verification process.
IMPORTANT NOTE:
- Make sure you meet the eligibility criteria.
- Enable two-factor authentication on your profile. This adds a layer of security by requiring a code when logging in from unrecognized devices.
- If you subscribe for two profiles, ensure they are added to the same Accounts Center and may need to have the same name and picture.
- Finish the verification process within 3 days, or your subscription will be canceled, and you’ll be eligible for a refund.
Also Read: What Does WYO Mean On Instagram? Decoding The Popular Slang Term
Practical Tips to Enhance Your Verification Odds
Getting verified on Instagram might seem tough, but there are some straightforward steps you can take to boost your chances of getting that blue check mark.
- First off, make sure your profile is all setup. You’ll need a clear bio, a profile picture, and consistent posts that show who you are or what your brand is about. It’s important to talk and connect with your followers regularly to build a strong presence.
- Another good move is to get your name out there in various reputable news sources or publications. This shows there’s genuine interest in what you do. Try not to link your Instagram to your other social media profiles in your bio. Doing so can make your Instagram look less genuine.
- Lastly, the best time to apply for verification is when you’re most active and people are really noticing you. This increases your chances of getting verified.
Conclusion
In short, getting verified on Instagram boosts your credibility and makes you more visible. It marks you as genuine. To meet Instagram’s requirements, keep your profile complete, prove your significance, and ensure you’re the only one like you. You can follow the regular process or use the Meta Verified service. Either way, sticking to Instagram’s strict rules is key. This effort not only strengthens your online presence but also builds trust and engagement with your followers. Keep visiting LavaCow for the latest social media updates and information.